在JavaScript中我们接触过面向过程的编程思想,比如丛林中三只萤火虫在随意飞翔,对于这种动画效果,我们知道了它具有的元素和飞翔过程,依序去创建元素,然后给元素加动画效果。然而在编程中,还有一种非常重要的思想,在今后的编程中会经常用到,那就是面向对象的编程思想。
接下来就用拖拽案例来说明一下,要达到如下效果:
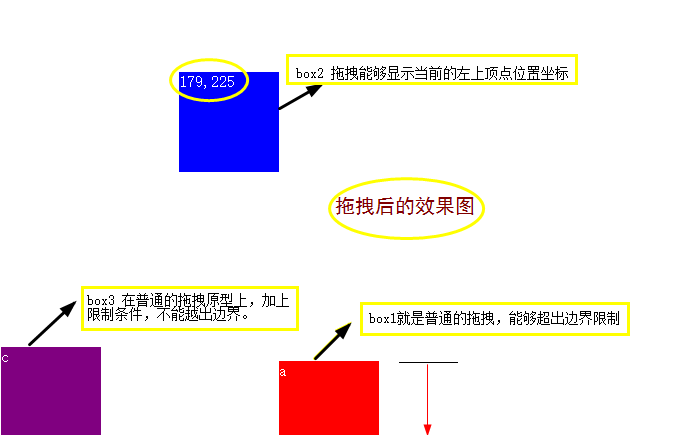
1.第一个box能够在页面上随意拖拽
2.第二个box能够在页面上随意拖拽的同时内部显示位置坐标
3.第三个box能够在页面上随意拖拽但不能够越出页面边界
在开始代码前,提个函数属性,在js中每一个函数都有prototype属性,指向一个对象。而且prototype属性对于构造函数有很大的用处,尤其在接下来的案例分享中它发挥着关键作用。再者就是继承思想,原型对象具有的属性,后面的对象也会具有,并且还具有其他方法。
先来看下html结构、css布局,这两块不难吧!
<!DOCTYPE html>
<html lang="en">

<head>
    <meta charset="UTF-8">
    <meta name="viewport" content="width=device-width, initial-scale=1.0">
    <meta http-equiv="X-UA-Compatible" content="ie=edge">
    <title>拖拽-原型对象</title>
    <style type="text/css">
    /* css布局如下 */
        * {
            margin: 0;
            padding: 0;
        }

        .box {
            width: 100px;
            height: 100px;
            position: absolute;
            color: #ffffff;
        }

        #box1 {
            background: red;
        }

        #box2 {
            background: blue;
        }

        #box3 {
            background: purple;
        }
    </style>
</head>

<body>
    <!--三个box元素-->
    <div class="box" id="box1">a</div>
    <div class="box" id="box2">b</div>
    <div class="box" id="box3">c</div>
</body>
</html>
在实现对第一个box的拖拽前,封装一个普通拖拽函数。DragBox.js代码入下:
function DragBox(boxId) {
    //判断一下传入的对象元素,是否定义
    if (boxId == undefined) {
        return;
    }
    //  属性,获取节点元素
    this.ele = document.getElementById(boxId);
    console.log(this.ele); //可以查看是否为对象
    var self = this;
    // 因为物体一开始创建就具有拖拽的能力,所以,一开始就进行鼠标按下的设置
    this.ele.onmousedown = function (e) {
        e.preventDefault();  // 阻止默认事件发生
        self.detaX = e.clientX - self.ele.offsetLeft;
        self.detaY = e.clientY - self.ele.offsetTop;
        // 开始
        self.start();
        // 停止
        document.onmouseup = function () {
            self.stop();
        }
    }
}
// 给构建函数的的原型添加方法 1: 控制开始
DragBox.prototype.start = function () {
    var self = this;
    document.onmousemove = function (e) {
        var x = e.clientX - self.detaX;
        var y = e.clientY - self.detaY;
        self.move(x, y)
    }
}
// 给构建函数的的原型添加方法 2: 控制移动
DragBox.prototype.move = function(x, y) {
    var self = this;
    self.ele.style.left = x + "px";
    self.ele.style.top = y + "px";
}
// 给构建函数的的原型添加方法 3: 控制停止
DragBox.prototype.stop = function () {
    document.onmousemove = null;
}
不知看到这里,你们明白了多少。可以调用函数来测试普通的拖拽效果。
new DragBox("box1"); // new 方法调用函数,box1可以实现拖拽
接下来应用原型和继承思想,实现box2的效果:
<script>
        // box2里加运动的坐标
        function DragBoxT(BoxId) {
          //回调DragBox函数
            DragBox.call(this, BoxId);
        }
        // 构造拖拽函数后原型继承普通拖拽函数
        DragBoxT.prototype = new DragBox();
        console.log(DragBoxT.prototype);
        DragBoxT.prototype.move = function (x, y) {
            DragBox.prototype.move.call(this, x, y);
            // 给当前拖拽元素增加位置坐标的内容
            this.ele.innerHTML = x + "," + y;
        }
        new DragBoxT("box2");
</script>
最后,来实现box3的效果:
<script>
        // box3 不出页面边界
        function DragBoxNoOut(BoxId) {
            DragBox.call(this, BoxId);
        }
        DragBoxNoOut.prototype = new DragBox();
        DragBoxNoOut.prototype.move = function (x, y) {
            // 判断x,y距离值和边界限定值的大小关系,阻止越界
            if (x < 0) {
                x = 0;
            } else if (x > 1200) {
                x = 1200;
            }
            if (y < 0) {
                y = 0;
            } else if (y > 500) {
                y = 500;
            }
            this.ele.style.left = x + "px";
            this.ele.style.top = y + "px";
        }
        new DragBoxNoOut("box3");
</script>
写在最后,看到这里,整个拖拽案例的分享就结束了。是不是很神奇却又一脸懵逼。原型思想和继承思想还要多加理解,多用案例进行切实操练。
本文首发于简书:JavaScript面向对象的原型和继承思想的拖拽案例
博文作者:飞一般的八哥